
Как сделать сброс до заводских настроек навигатора prestigio geovision 5300
Обновлено: 08.07.2024
После запуска на Prestigio GeoVision 5300BT "АЛЬТЕРНАТИВНОЕ МЕНЮ ДЛЯ GPS НАВИГАТОРА"(нашел на рутрекер.орг) кнопка включения\выключения перестала возвращать в главное меню, т.е. то которое я вижу при первом включении навигатора.
Для выключения приходиться держать кнопку около 10 сек, раньше появлялось пяти секундное меню, теперь он просто тухнет через 10 сек.
Каким способом это вылечить.
Сделай общий сброс. Справа, где usb-разъём, маленькое отверстие с кнопкой внутри, которую нужно нажать иголкой
Каталог инструкций / Производители / PRESTIGIO / GEOVISION 4300, GEOVISION 4300 BTFM, GEOVISION 5300, GEOVISION 5300 BT
Инструкция для PRESTIGIO GEOVISION 4300, GEOVISION 4300 BTFM, GEOVISION 5300, GEOVISION 5300 BT

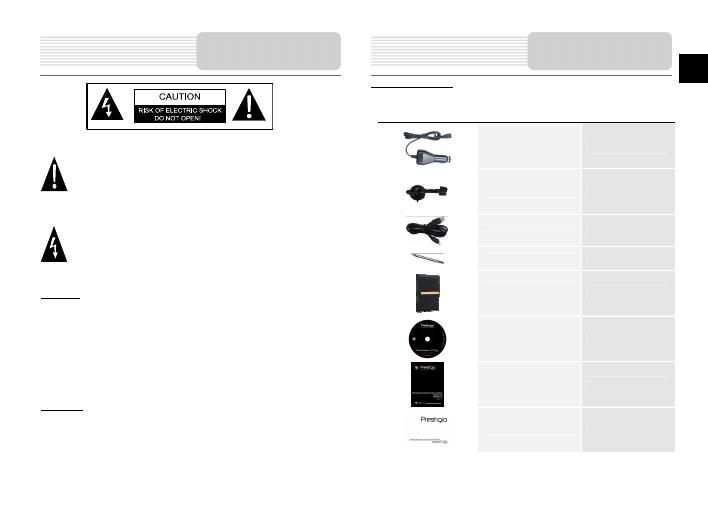
ПРЕДОСТЕРЕЖЕНИЕ
Чтобы устранить риск поражения электрическим током, не открывайте корпус
устройства. Внутри корпуса нет частей или деталей, ремонт которых может
быть выполнен самостоятельно. Предоставьте всю работу по устранению
неисправностей квалифицированному техническому персоналу. Отключите
шнур питания из розетки перед обращением в сервисную службу или в тех
случаях, когда Вы не планируете пользоваться устройством
длительного периода времени.
Производитель не несет ответственность за повреждения, вызванные
несанкционированными изменениями в конструкции данного устройства.
При неправильной замене батареи существует риск взрыва. Заменяйте
батарею только на
аналогичную или на равноценную батарею.
ПРЕДУПРЕЖДЕНИЕ
Не размещайте емкости с водой или другой жидкостью, а также мелкие предметы
на верхней поверхности устройства, так как при их попадании внутрь устройства
product from th e wall outlet before servicing or when it is unused for a long period of time.
2. The manufacture r should not hold respon sibility for the damage caused by any
substitutions a nd modifications of the prod uct without authoriz ation from the manufacturer
3. Danger of explosion if batt ery is incorrectly replaced. Replace only with the same or
The apparatus sha ll not be ex posed to dripping or splashing and that no object s filled with
liquids, such as vases, shall be placed on the a pparatus.
The exclamation point within an e quilateral triangl e is intended to aler t the user
to the presence of i mportant operat ing and maintena nce (servicing) i nstructions
The lightning f lash with arro whead symbol, wit hin an equilateral t riangle, is
intended to alert the us er to the presence of un- insulated “dang erous voltage”
within the prod uct’s enclosure th at may be of suffi cient magnitud e to
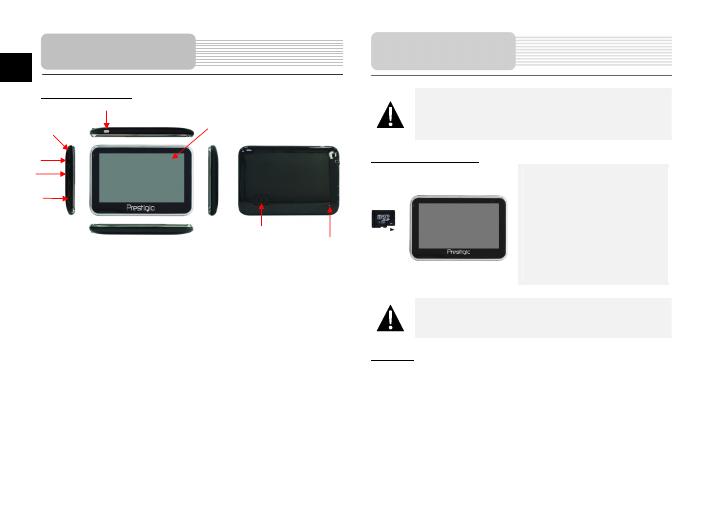
T ap the screen with touch pen or fing er to select menu comman ds or to enter
The indicator glows in bri ght amber color when battery i s fully charged and in red color
Receives micro SD memory card for data access or memor y expansion.
Connects to U SB Cable for d ata access or battery chargi ng
Press to restor e system to factory default settin gs.
Please alway s make sure that the d evice and any other external device
connected to the devic e are powered off and un plugged from the power
supply before at tempting to c onnect the device t o any external de vice.
Please alway s make sure that no appl ication is accessi ng the microSD
Flip open the prot ective rubber cov er towards the front of the device.
Insert USB connector into the appropr iate USB port.
Insert the other USB connector i nto USB port on PC to start charg ing.
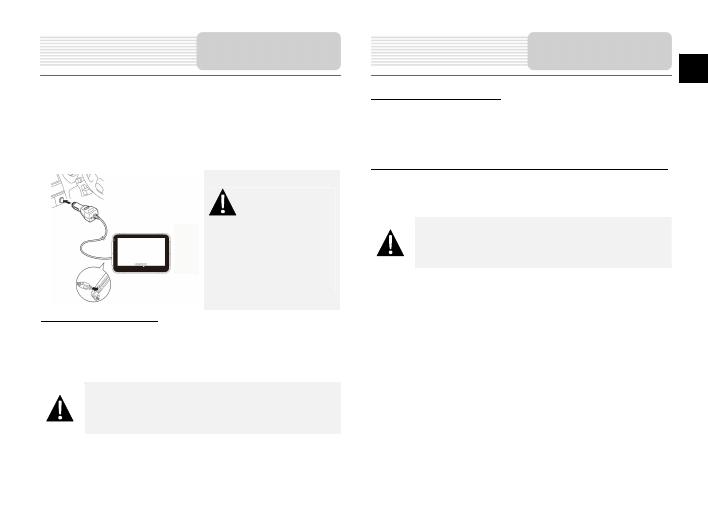
Flip open the protective rubber cover towards the left side of the device.
Insert USB connect or into the appropr iate USB port.
Insert car charger connector into vehicle 12V accessory/cigarette socket to start
Flip open the protec tive rubber cover towards the front of the device.
Insert earpho ne plug (not included) into the appr opriate earphone port to s witch
Excessively loud volume is pot entially detri mental to heari ng. Please turn
down the volu me before conne cting the earph one and gradual ly turn up
The device i s equipped wit h a built -in rechargeabl e battery . Please fully charge the battery
(for at least 8 hours) befor e initial use. The battery st atus indicator glows in red c olor when
charging and tu rns bright amber color when chargin g is complete. Ch arging time is
Working conditions and precautions for the rechar geable battery
Device with new batteries sh ould be fully char ged before init ial use.
Battery shoul d only be used and charged when te mperatures are b etween 0 ~ 37 C.
It is not necessar y to start chargi ng the device b efore the battery is fully discharg ed.
Please connect the car charger t o vehicle 12V acc essory/cigarett e
socket after vehicle engine is sta rted to protect the device fro m sudden
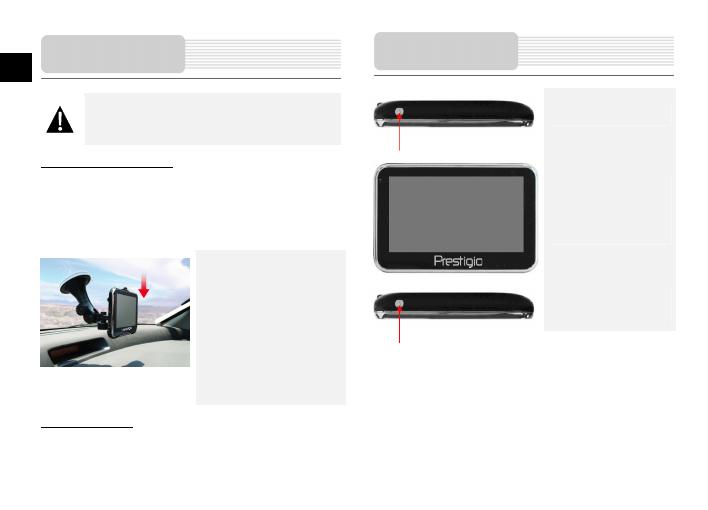
Please select an appropriate location on the dashboard or
windshield where the dev ice will not obstruct d river field of vision.
The device can be securel y mounted on vehicle das hboard or windshield with the mounting
cradle incl uded. Please follo w procedures bel ow to operat e mounting cradl e:
1. Select an appropr iate location on windshield or das hboard where the d evice and
mounting cradle will not obstruc t driver field of vision.
2. Please also make sure that the device has a clea r view of sky to att ain best GPS
1. Push the tap on top of the mou nting cradle to r elease the de vice.
2. Lift the suction cup le ver to easily remove the suction cu p from windshield or
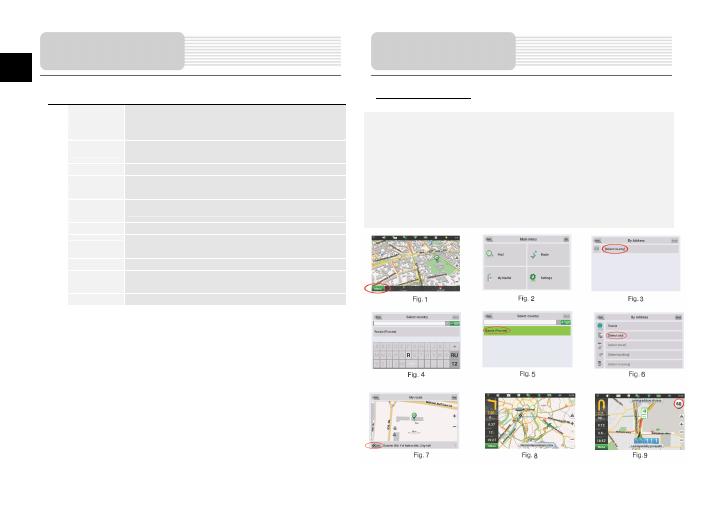
Shortly after the greeting screen is shown, main menu w ill be displa yed automatically .
T he Dial up N etworkin g (DUN) func tion allows you to conne ct your
navigation device to intern et. T o enable DUN, please turn on Blueto oth.
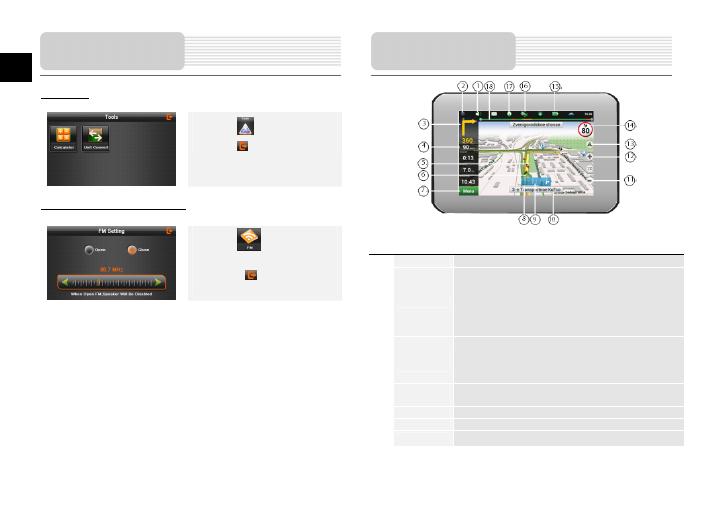
Context menu opens by press ing this button. In this menu
A sign of the upcoming maneuve r. There are vari ous turns,
distance to the next maneu ver in meters or kilometer s, etc. on a
gray backgrou nd. Clicking on t he sign stops the route guidan ce
The estimated t otal time in a way, the total len gth of the route, t ime
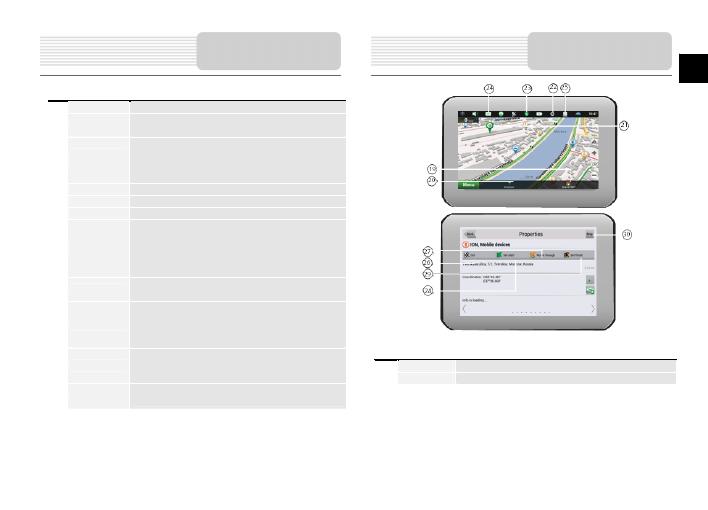
8 Progress-bar Bar is fill ed in as you approach the place of maneuver.
Displays the traffic lanes with valid maneuvers at the next
Shows the name of the street you are cur rently driving alon g.
Available only if GPS/GLONASS co nnection is establ ished. If
In excess of th e established spe ed displays the sp eed limit on
If warning of th e cameras turne d on in the setti ngs, then when
Icon shows th e level of battery charge. Press i t to see the
GPS/GLONASS connect ion icon. If the indicator is grey —
receiver is dis abled, red — s witched on, but t he connection is
not establishe d, yellow - poor c onnection, green – connection
established. There is a n umber of the sa tellites in the dot.
Pop-up menu t o work with Navitel .Friends servic e. Here you
Allows you to see the entire ro ute, your locati on and traffic
Y ou can set the mark by taping on the map. Y ou can save this
to the route or see object’ s characteristics the mark was set on.
Trac k record. Red dot mea ns that the tr ack is recording, grey
23 Traffic Jams* Shows the current traffi c jams on a 10-point scale.
This button is intended to read/s end SMS-messages. Near the
Mark becomes the start point on t he route. Y ou should turn of f
Mark on the map becomes the end of the rout e. And pre vious
* - This function i s available only on some devices with GSM or Bluetooth with
DUN supp ort. Please, ref er to your suppli er for more infor mation.
Перед Вами Инструкция gps-навигатора Prestigio GeoVision 5300 BTVMTV. Вы можете ознакомиться и скачать данное руководство по эксплуатации бесплатно. Инструкция по применению на русском языке, предложенная производителем, позволяет правильно использовать Вашу бытовую технику и электронику.
Инструкция gps-навигатора Prestigio GeoVision 5300 BTVMTV
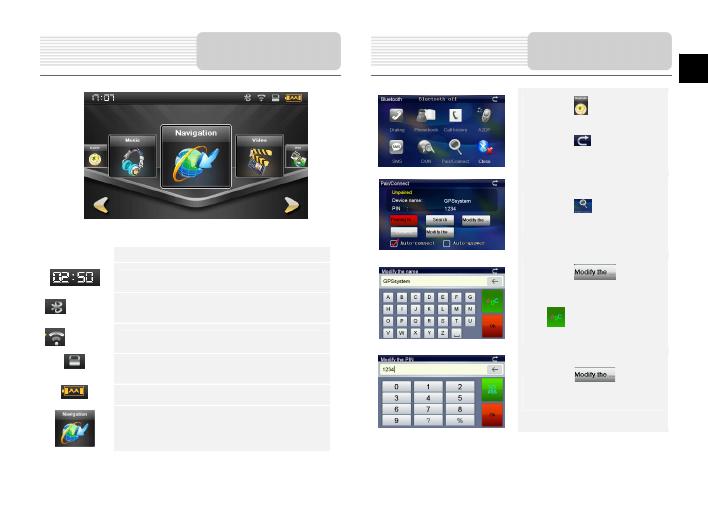
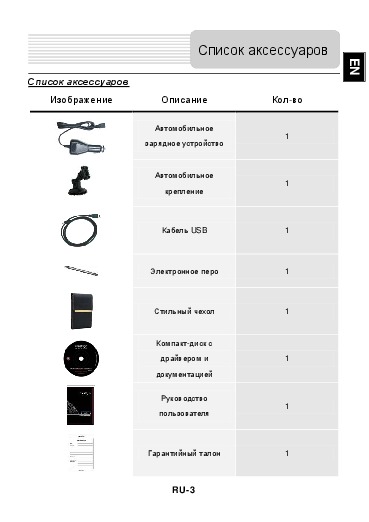
Информация отображена на картинке
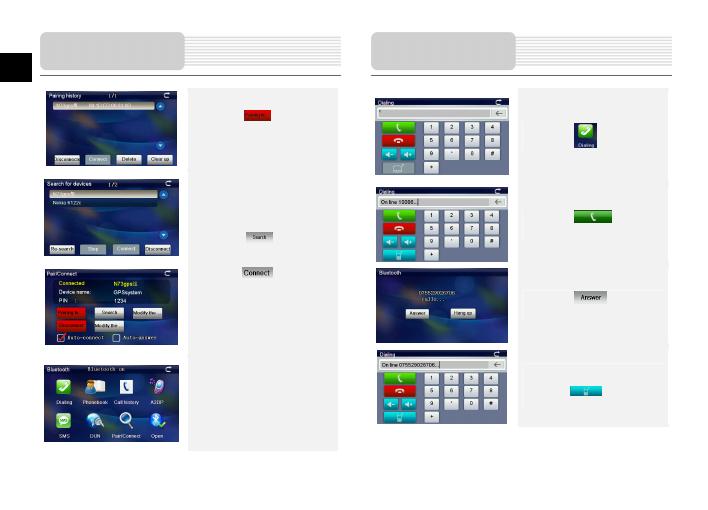
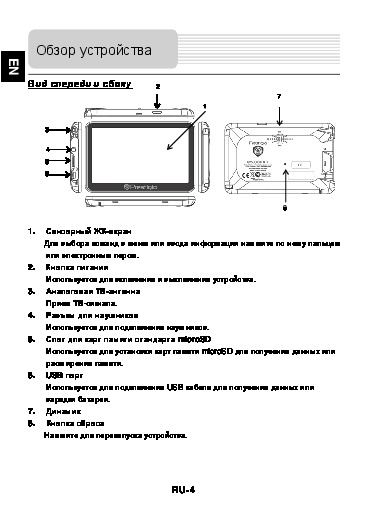
Информация отображена на картинке
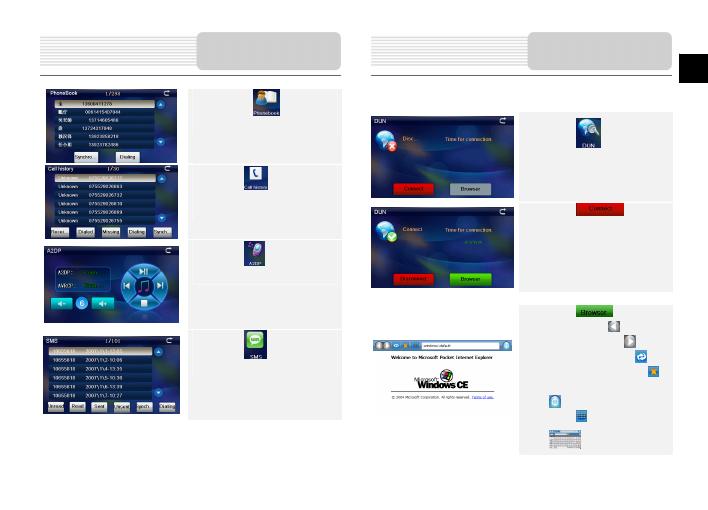
Информация отображена на картинке
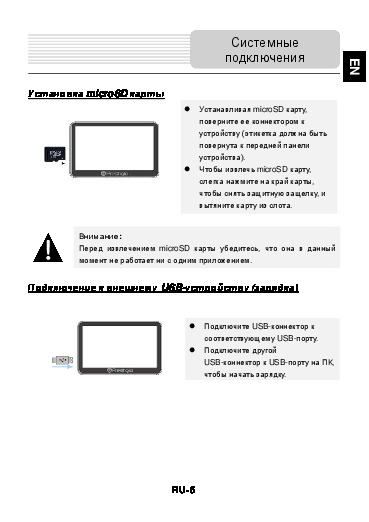
Информация отображена на картинке
Для Вашего удобства
Если листать руководство пользователя gps-навигатора Prestigio GeoVision 5300 BTVMTV прямо на сайте, не очень удобно для Вас, есть два возможных решения:
Читайте также: